Lecture 14: Intro to SQL, Retrieving Data from DB

Recording

Class was not held in person on this day. See edstem announcement for details.

Link to recording:
https://usc.zoom.us/rec/play/xWvs-0P-v5gcbYgnM-KPuLLCpjmOsnn1MsUAMRjXpFQU7Jzb0_O9Q1mnEFWVpxhKgu8c2tZsXolOIGY.j1Fa_IxLbbgdkwhj

To-do for today’s class

  • Download song.sql.
  • Login to cPanel and create a new database named username_song_db
  • Download and install the latest MySQL Workbench if you haven’t already: https://dev.mysql.com/downloads/workbench/.
  • Refer to below EER diagram of Song Database.

Slides


Link to download PDF version of slides.

Completed Files

Assignment 7: SELECT SQL Statements

Overview

This assignment consists of two parts: importing DVD database (needed for future assignments) and writing SELECT SQL statements against the DVD and song databases.

Requirements

Part 1 – DVD Database Import

  1. Download dvd.sql file.
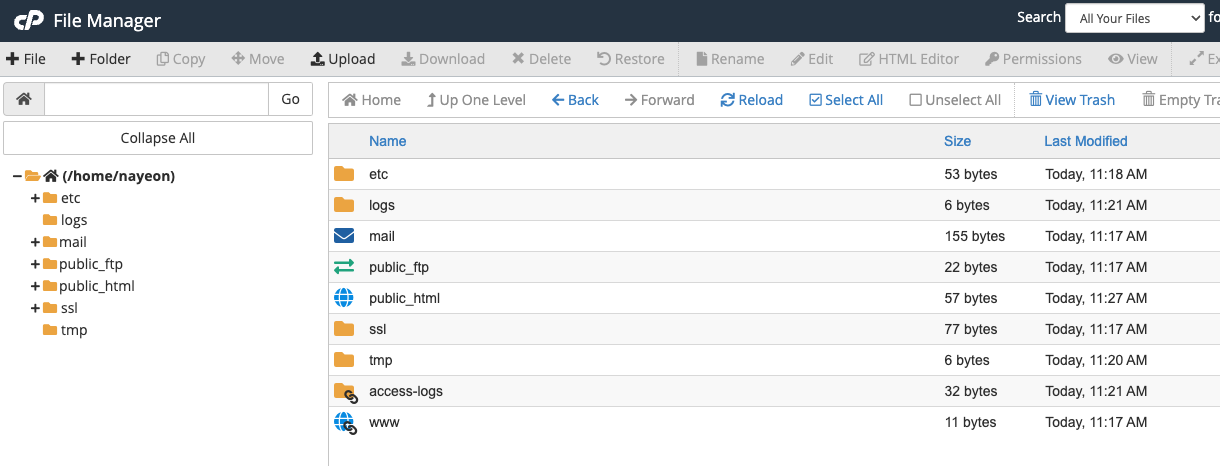
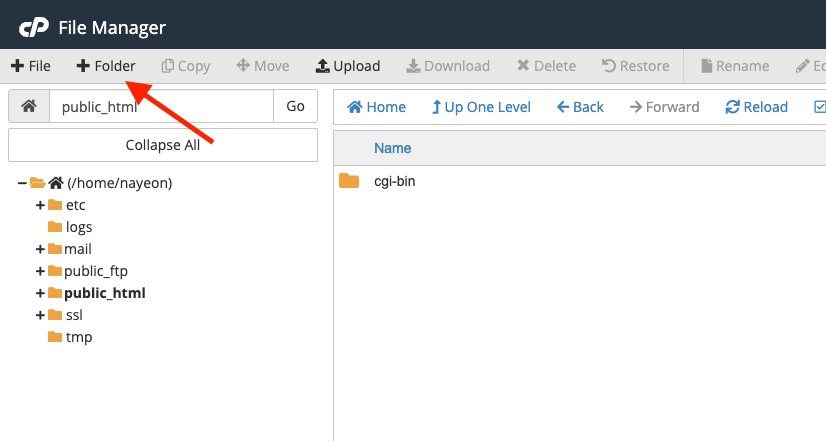
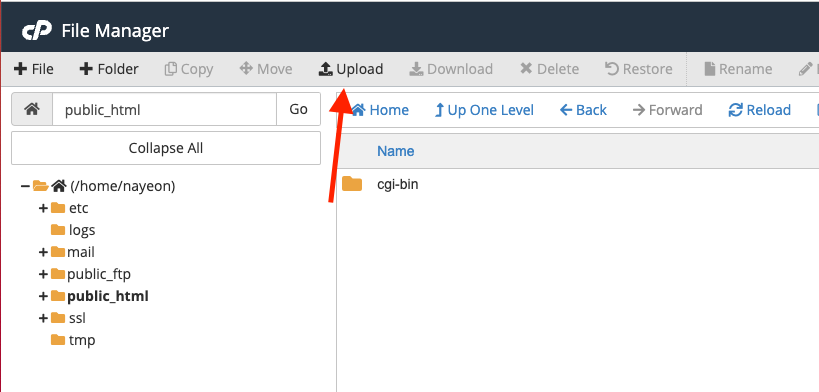
  2. Create a new database in cPanel → MySQL Databases.
    1. Name it username_dvd_db (cPanel will prefix your username for you automatically).
    2. For example: ttrojan_dvd_db.
  3. Import dvd.sqlfile to the newly created database.
    1. cPanel → PHPMyAdmin → [Click on username_dvd_db Database] → Import.
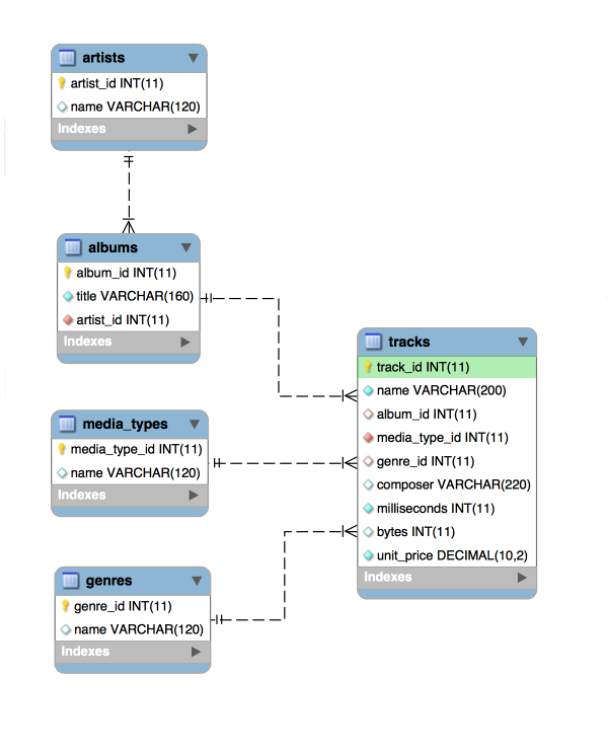
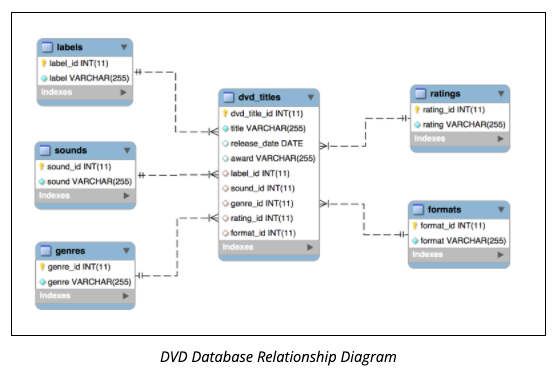
  4. Verify all tables exist and are populated with data.
  5. All tables and relationships should match the figure below.

Part 2 – SELECT SQL Statements

Open up MySQL Workbench and create one .sql file. In this file, you will write six SQL statements – four statements against the song database and two statements against the DVD database you just imported in Part 1. Above each statement, write a comment with the below prompt.

Important: Use JOIN statements when querying from multiple tables as taught in lecture. Do NOT select multiple tables on FROM statement. See this stackoverflow link for more info.

Song Database SELECT statements (4)

  1. Display albums that have the letters “on” somewhere in the album title. Sort results in alphabetical order by album title.
    Sample results:

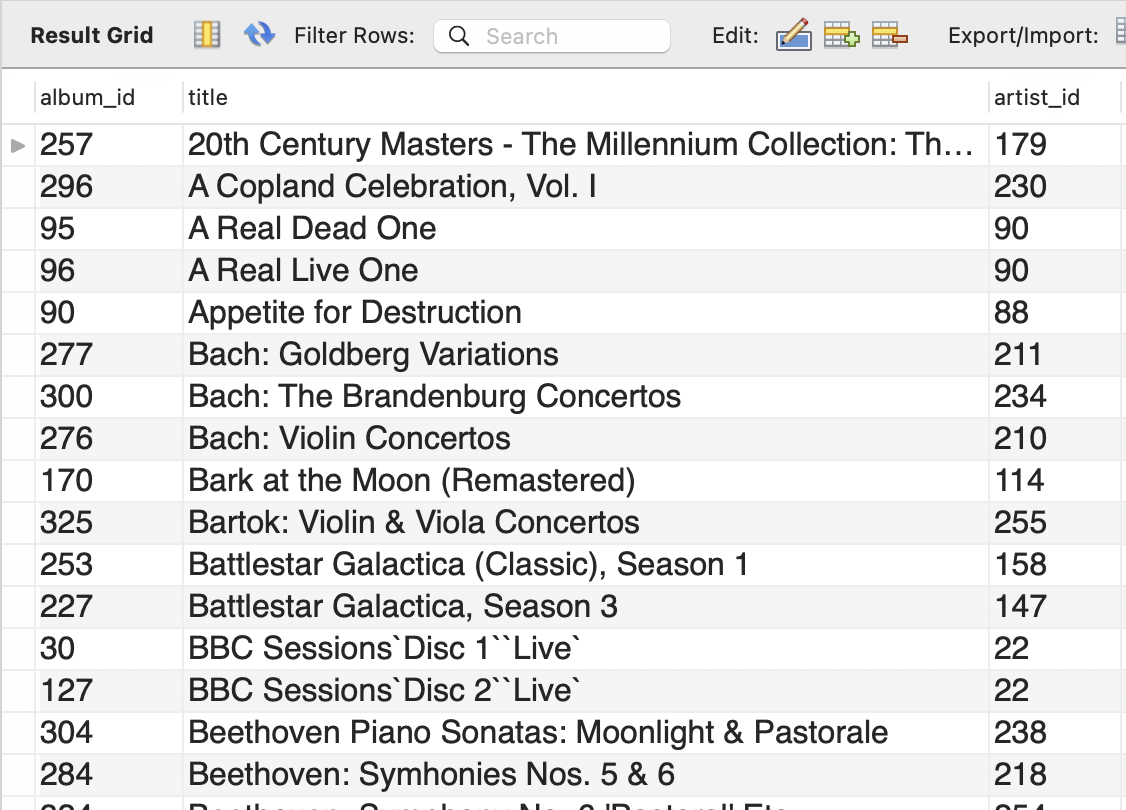
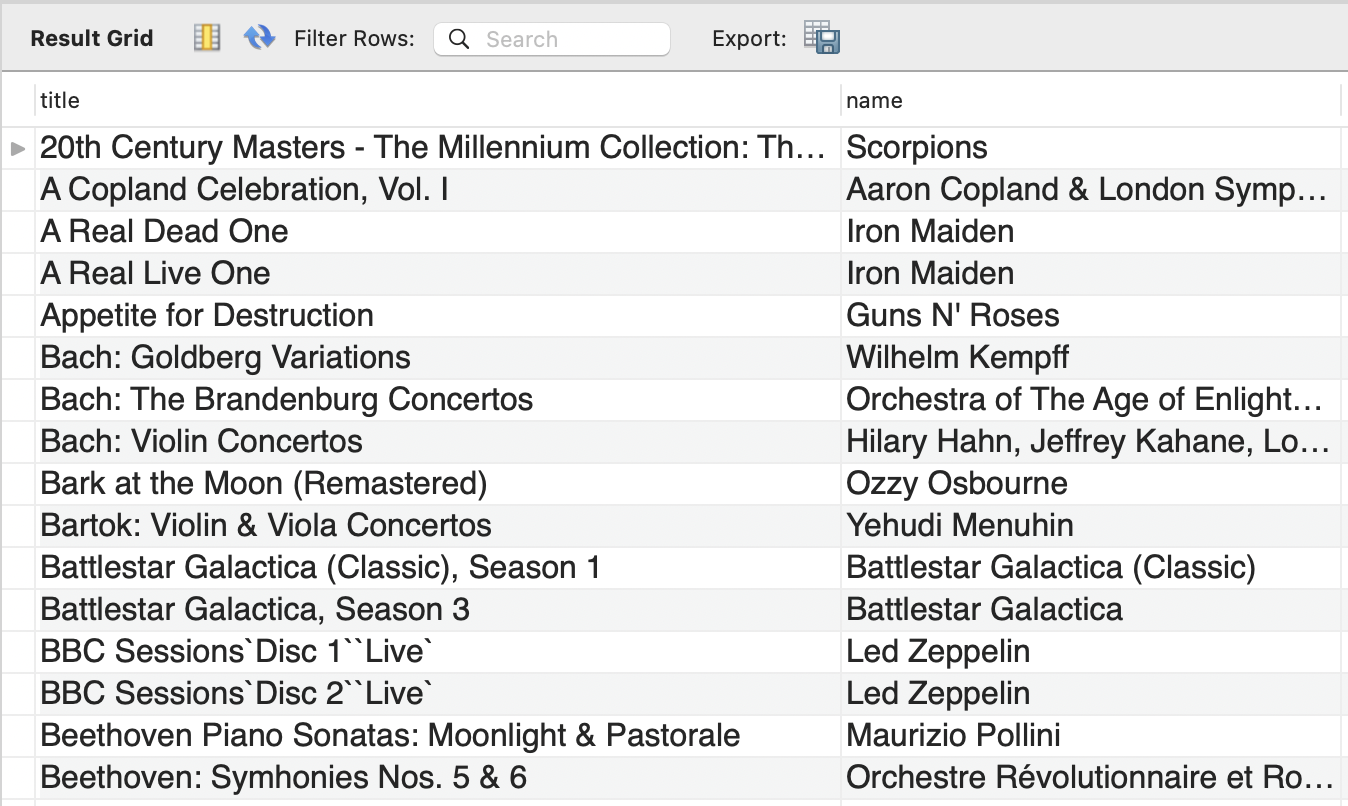
  2. Same as #1, but only show album title and artist name (no artist_id) columns.
    Sample results:

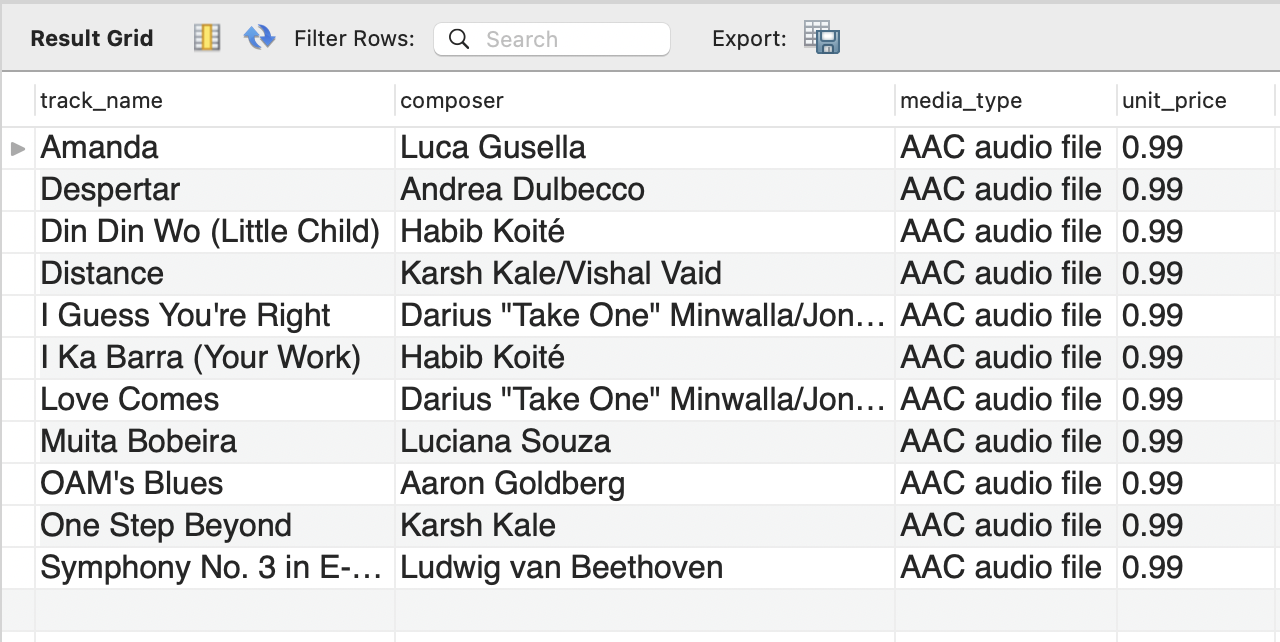
  3. Display tracks that have AAC audio file format. Only show track name (alias: track_name), composer, media type name (alias: media_type), and unit price columns.
    1. Use primary key like media_type_id column for comparison instead of strings like media type name.
      Sample results:

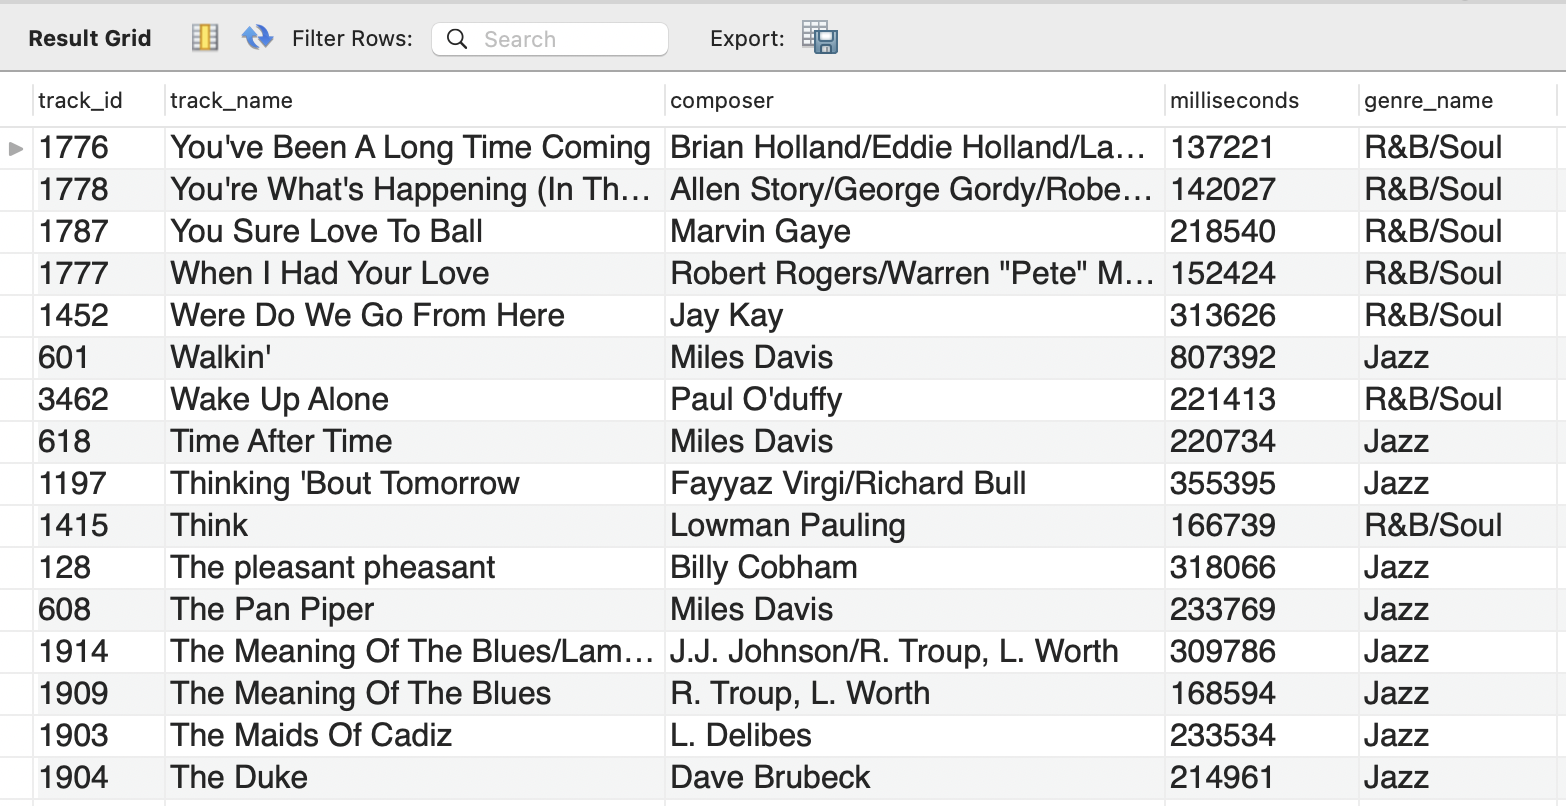
  4. Display R&B/Soul and Jazz tracks that have a composer (not NULL). Sort results in reverse-alphabetical order by track name. Only show track ID, track name (alias: track_name), composer, milliseconds, and genre name (alias: genre_name) columns.
    1. Use primary key like genre_id column for comparison instead of strings like genre name.
      Sample results:

DVD Database SELECT statements (2)

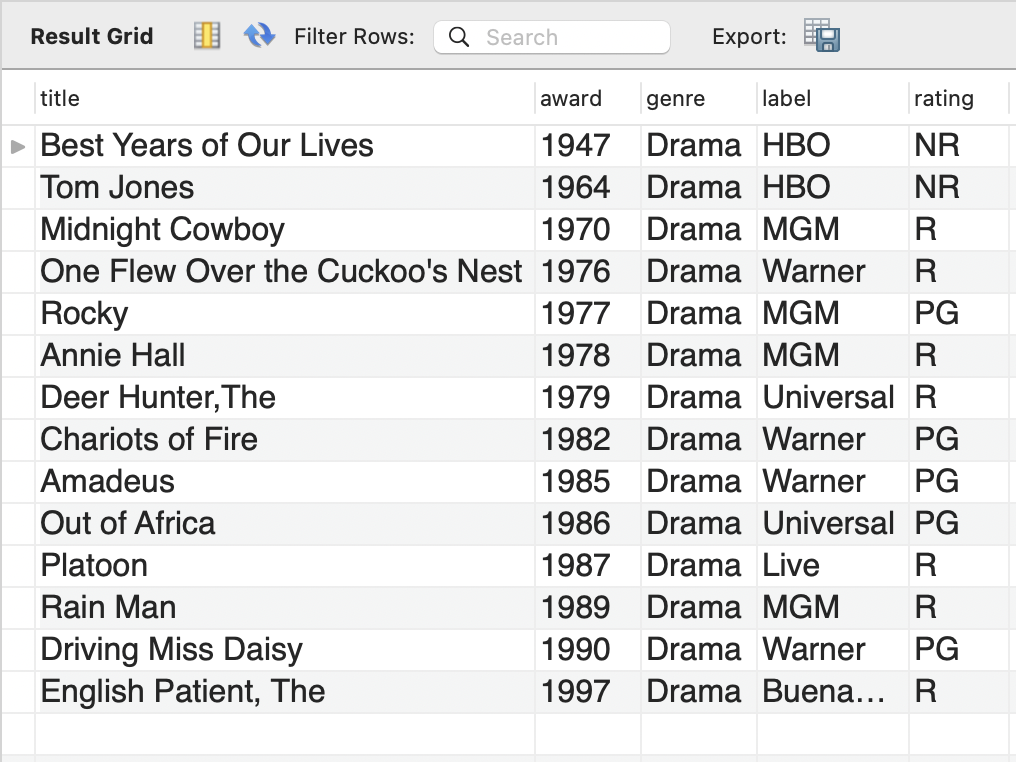
  1. Display DVDs that have the genre Drama that won awards. Sort results by year of when the DVD won an award. Show dvd title, award, genre, label, and rating.
    1. Use primary keys for comparison instead of the string names.
      Sample results:
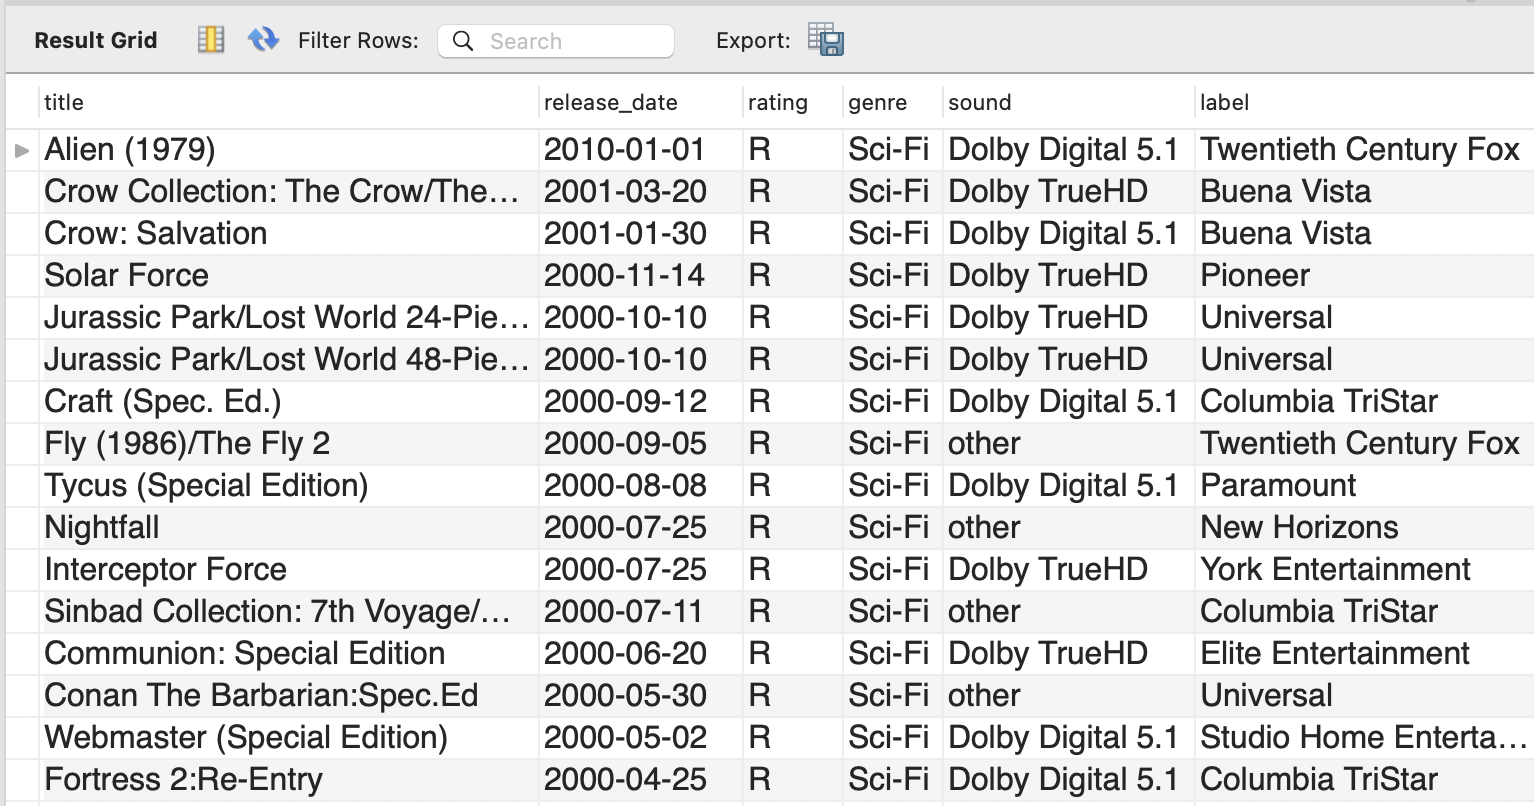
  2. Display R-rated Sci-Fi DVDs that have a release date (not NULL). Order results from newest to oldest released DVD. Show dvd title, release date, rating, genre, sound, and label.
    1. Use primary keys for comparison instead of the string names.
      Sample results:

Submission

When complete, you must upload the completed .sql file on Blackboard. Go to Assignments -> Assignment 7: SELECT Statements and upload the file. There is no need to upload this file to the server.

Lecture 13: Database Basics, Designing Databases

To-do for today’s class

Slides


Link to download PDF version of slides.

Completed Files

Completed files is a .mwb file that we created together in class. However, seeing it won’t be very helpful. If you are missing something, I recommend re-watching the last ~30 minutes of the lecture or looking at the Workbench Guide pdf.

  • Coming soon…

Midterm: Client-Side Information

Midterm: Client-Side Information

When & Where: Online, through Gradescope.com can start the exam between Thu, 2/24 12:00 pm PST to Fri, 2/25 6:00 pm PST.

Length & Format: 80 minutes, online exam.

Topics: Everything taught from Lecture 1 to Lecture 12 (covered on 2/17)

Types of Questions: 

  • Multiple choice – select one answer
  • Multiple choice – select all that apply
  • True/False
  • Fill in the blank
  • Short Code

How to take the exam:

  • Log in to gradescope.com. You will need to create an account if you haven’t already with your USC email address.
  • Once you have logged in, you should see two “Online Assignments” for ITP 303.
  • Take the “Practice Gradescope Exam” first. It is a very short and simple practice exam just so you can get familiar with taking an exam on Gradescope.
  • Then take the “Midterm: Client-side Exam” — this is the real exam.
  • For the short code questions, write your code on VS Code or another text editor first. Then copy-paste the answers to gradescope. This will help maintain the format of the code (e.g. indentation) and also you can run your code before submitting it.
  • Have questions during the exam? Because you are allowed to take the exam at any time, we will be unable to answer questions you have during the exam like you would in a physical setting. Make your best-educated guess and for really uncertain questions make a note about it separately and make a private post about it on edstem after the exam.

Important Notes:

  • This is an open-book exam. You may use notes, slides, and online resources. The only thing you CANNOT do is collaborate with any human beings on this exam. Do not discuss with anyone about the exam. Your exam must be completed on your own, by yourself.
    • Any suspicion of collaboration will be reported to SJACS.
  • I highly recommend you create one single reference sheet instead of scouring your notes/slides/etc during the exam. This is a timed test so you want to limit time wasted on looking stuff up.
  • No questions about any specific third-party API will be asked (e.g. What’s the endpoint used to get the latest playing movie from the Movie DB API?). You do not need to know a specific third-party API’s methods, endpoints, etc.

Tips:

  • Anything that appeared on the lecture or the slides is fair game. The best way to study for this exam is to review the code from lectures and your labs and assignments and review what each line of the code does. Rewriting some of the code is very helpful.
  • Review the links under Helpful Reading under each lecture notes to get a deeper understanding of topic(s) taught in that lecture. You do not need to know everything from the links included in Resources, but the resources will help you understand the core material better.
  • Review the Midterm Study Guide

Lecture 12: Event Propagation, Web Storage

To-do for today’s class

Slides

No slides

Helpful Readings

Completed Files

Lecture 11: jQuery

To-do for today’s class

Slides

Link to download PDF version.

Completed Files

Assignment 6: To Do List App

Overview

For this assignment, you will create a simple To Do List app using jQuery. This assignment will also help you review your HTML and CSS skills in preparation for the upcoming midterm exam.

Suggested approach: start with HTML first and make the delete / add functionalities work. Work on styling at the very end. Following the requirements step by step is highly recommended.

Sample

Note: Samples below don’t always meet all the requirements. Make sure to follow the requirements rather than solely relying on the samples.

Requirements

Note: Steps 1-3 are from this week’s lab. If you have submitted the lab, make copies of the lab files for assignment 6. Do not modify lab files past the lab deadline!

  1. Code set-up
    1. Write all HTML in a file named todolist.html.
    2. Write all CSS in a file named style.css file.
    3. Write all JS in a file named main.js file.
    4. Include the jQuery library in your .html file.
    5. Link the CSS file and JS file in your .html file.
      1. You can add your .js file in your .html file by using <script src="name_of_file.js"></script>
  2. Use jQuery for all your DOM manipulation and event listening. You will write very little vanilla JS.
    1. Note you can still use JavaScript along with jQuery. For example:
      $("button").on("click", function() { //jQuery way of writing event handlers
          let isOn = true; // JS way of creating variables
          if( isOn == true) { // JS way of if/else statements
              $("input").val("The app is on");
          }
      });
  3. Today’s weather information is displayed at the top of the page.
    1. Use Weatherbit.io’s API to get this information. You will need to create a free account to obtain an API key.
    2. Read the documentation to find out how to get the weather in Los Angeles.
    3. Get the temperature, a description, and the apparent temperature (“feels like”).
    4. The temperature must be in Fahrenheit.
  4. To Do list structure
    1. Create a container that will hold all your to do list items. The container should be between 400 – 600px wide.
    2. At the top of the list, add a heading that reads “To Do List.” Add a background color of your choosing.
    3. Below the heading, add an input area that allows users to type in a to do item here.
      1. Include a placeholder that reads “Add to-do item here”.
      2. Do not add a “Submit” button.
    4. Below the input area, create a list of to do items using the <ul> tag. By default, have at least three items hardcoded.
  5. Change the city and remember the city
    1. Add a dropdown at the top of the to do list. Add three cities of your choices as options in the dropdown (Los Angeles can be one of them).
    2. When user changes the dropdown, call the Weatherbit API again and get the weather for the city that the user selected.
    3. Save the city that the user chose last in Local Storage.
    4. When the page is refreshed, the city selected in the dropdown must be the city that the user chose last (retrieve from Local Storage).
  6. Deleting an item
    1. Have three items hardcoded in so that you can easily test the delete function.
    2. When a user clicks on the to do item text (not the square), change the color of the item and strike it out. Both of these changes can be done using CSS properties. When a user clicks on the to do item text again, change the text style back to normal.
    3. When a user clicks on the square (or X if you have not replaced it with a square icon yet) next to the to do item, remove the to do list item entirely from the DOM.
      1. Fade out the item before removing it.
      2. Hint: there is a jQuery method that removes DOM elements.
    4. The to do item must be removed ONLY when the square is clicked.
    5. If the item is not crossed out and a user clicks on the square button, do not cross out the item when it is removed. The item must only be removed and not crossed out.
  7. Adding an item
    1. A to do item is added to the bottom of the list when a user types into the input area and presses the ENTER key. There is no button to submit this information.
      1. Hint #1: Forms get submitted when user presses ENTER key.
      2. Hint #2: jQuery has a method that allows you to easily append items.
    2. After adding an item, try to delete the item that was just added. You may find that you cannot delete the dynamically created item. Read about Event Delegation and Event Propagation here to help you solve this problem: http://learn.jquery.com/events/event-delegation/
  8. Styling
    1. Icons – The square icon and plus icon shown in the sample are from the icon library Font Awesome here: https://fontawesome.com/. You can read their documentation to learn how to use these icons OR you can use emojis instead from: https://emojipedia.org/
      1. You are free to use any icons you wish. You do NOT have to use the square or plus icon shown in the sample, but do pick icons that make sense 🙂
      2. If using emojis, you can simply copy paste the emoji into your code.
    2. Font Family – Choose a font family that is not a default web font (e.g. Arial or Times New Roman). Google Fonts is a great resource.
    3. Colors – Choose your own colors. Colors do not need to match the given sample.
      1. Add a background color for the whole browser.
      2. Add a background color where you display the weather information.
    4. Hover effect – When a user hovers over any of the list items, change its background color to a color of your choosing.
    5. Box-shadow – Not discussed in lecture before, but it is a neat CSS property that enhances the look of the list. Add a box shadow around the container of the to do list.
      1. Read more about the box-shadow property at MDN.
      2. A quick google search will reveal many sites that generate box-shadow effects for you.
  9. The plus icon
    1. When the plus icon is clicked, show / hide the input area.
    2. Add an effect so that it feels the input area is sliding up and down. See sample for details.
Submission/Upload to the server

Please follow the submission requirements below carefully. You will be deducted points for not following submission requirements to the teeth.

  1. Open a browser and go to https://303.itpwebdev.com/cpanel (it will redirect you to https://54-148-150-30.cprapid.com:2083/).
  2. Login with your username and password (this password does not sync with your USC NETID password. You set this password in Lab 1. If you don’t remember your password, post on EdStem and a course staff member will reset it for you).
  3. Scroll down to Files section and click on File Manager. You will see a list of folders and files like below.
  4. Double click to navigate inside the public_html folder.
  5. Create a new folder inside the public_html folder by clicking on the +Folder button on the top left.
  6. Name the folder assignment06. Double click it to navigate inside this folder.
  7. Click on “Upload” to upload all assignment6 files to this folder.
  8. Drag and drop all assignment files to upload into this folder.
  9. In your browser, go to http://303.itpwebdev.com/~yourusername/assignment06/todolist.html to check that the assignment file has been uploaded correctly.
  10. One last thing. In your computer, open up student_page.html that you created in Lab 2. Add a link to this assignment to student_page.html under the heading “Assignments” so that the graders can easily access your completed assignment.
  11. Re-upload the updated student_page.html to the itpwebdev server via cPanel -> Files -> File Manager. If it asks you want to overwrite the previous file, click Yes.
  12. If all the above is completed, go to your student page at http://303.itpwebdev.com/~yourusername/student_page.html and check that the link to this assignment is there. The TAs/graders use this link to access your assignment so make sure this is working! Below is a screenshot sample of what it should look like.
  13. (Optional) If you are having trouble uploading to the server and cannot upload on time, add all files for this assignment in a folder, compress it as a .zip file and upload it to Blackboard. On Blackboard, go to Assignments -> Assignment 6: To Do List. You will get some points deducted for not uploading correctly but at least you will not get a zero.

Lab 6: To Do List Starter

Overview

This lab is intended to help start your Assignment 6. Refer to the assignment requirements while you are working on this lab.

Sample

Requirements

  1. Code set-up
    1. Create the following new files:
      1.  todolist.html file,
      2. style.css file, and
      3. main.js file.
    2. Include the jQuery library in your .html file.
    3. Write all your CSS in the .css file.
      1. Link your .css file into the .html file.
    4. Write all your JavaScript in the .js file.
      1. You can add your .js file in your .html file by using <script src="name_of_file.js"></script>
      2. Use jQuery for all your DOM manipulation and event listening. You will write very little pure JS.
      3. Note you can still use JavaScript along with jQuery. For example:
        $("button").on("click", function() {
            let isOn = true; // JS way of creating variables
            if( isOn == true) { // JS way of if/else statements
                $("input").val("The app is on");
            }
        });
  2. Simple HTML structure
    1. Before working on adding/deleting items or styling the app, create a basic HTML structure that will help you start the assignment.
    2. Create an area at the top of the page with some text about today’s weather. A placeholder is fine for now.
    3. Below the weather information, create a container that will hold all your to do list items. Make this container somewhere between 400 and 600px wide.
    4. At the top of the to do list, create a heading that displays “To Do List.”
    5. Below the heading, add an input area that allows users to type in a to do item here.
    6. Below the input, use the <ul> tag to create a list of at least three to do items.
    7. Within the list item, add a placeholder for the “square” icon. This can simply be a character for now (In the sample, it is the X). Later you can replace the icon with an emoji (more details in A6).
  3. Simple CSS
    1. In your newly created .css file, add some basic CSS to help you get started.
    2. Add a border around the weather and to do list.
    3. Set a width to the weather and to do list.
    4. Center the weather and to do list to the browser.
    5. That’s sufficient for the lab. Feel free to add more CSS if you’d like.
  4. Weather API information is displayed at the top of the page.
    1. Get Los Angeles’s weather information from the Weatherbit.io’s API. Sign up for a free account to obtain an API key.
    2. Read their documentation to find out how to get Los Angeles’ current temperature (in Fahrenheit), a short weather description and the apparent temperature (what it “feels like”).
      1. Start by looking for the endpoint of the API. What’s the URL you need to hit to communicate with this service?
    3. Use jQuery’s ajax method get the information from Weatherbit.
  5. When completed, upload completed file to the server and add a link to this lab in your student_page.html. Re-upload the student_page.html to the server.

Lecture 10: JSON, AJAX, Third-Party Web APIs

To-do for today’s class

Helpful Readings

Slides

Link to download PDF version.

Completed Files

Lecture 9: JS Objects, DOM Manipulation

To-do for today’s class

Helpful Readings

Slides

Link to download PDF version.

Completed Files