Lecture 2: Intro to HTML & CSS, Divs, Box Model

To-do for today’s class

  • Download VS Code (or any other text editors such as Sublime Text or Atom)
  • Download FileZilla (client only)
  • Later during the lecture, copy paste the following text:

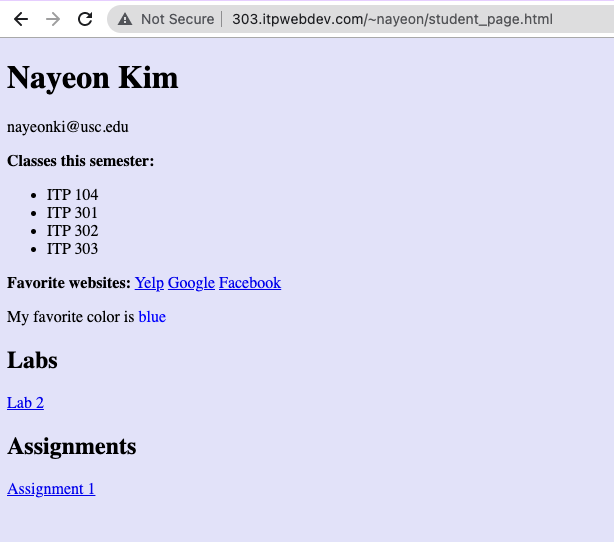
Pikachu is a short, chubby rodent Pokémon. It is covered in yellow fur with two horizontal brown stripes on its back. It has a small mouth, long, pointed ears with black tips, brown eyes, and the two red circles on its cheeks contain pouches for electricity storage. It has short forearms with five fingers on each paw, and its feet each have three toes. At the base of its lightning bolt-shaped tail is a patch of brown fur. A female will have a V-shaped notch at the end of its tail, which looks like the top of a heart. It is classified as quadruped, but it has been known to stand and walk on its hind legs.

The anime has shown that wild Pikachu live in groups in forested areas. Pikachu communicates amongst themselves using squeaks and tail-shaking as friendly gestures. Electricity can be used to receive and send messages with each other, as well as other Electric Pokémon species. It raises its tail to check its surroundings and is occasionally struck by lightning in this position. When groups grow, they can inadvertently cause lightning storms. Pikachu is found foraging for berries it roasts with electricity to make them tender enough to eat. A sure sign that Pikachu inhabits a location is patches of burnt grass. It has been observed eating and sometimes destroying telephone poles, wires, and other electronic equipment.

Slides

Link to download PDF version.

Helpful Readings

  • Getting Started with HTML (MDN) – this is the first article of a series of articles about HTML. Click “Next” on this article to continue reading.
  • What is CSS? (MDN) – this is the first article of a series of articles about CSS. Click “Next” on this article to continue reading.

Useful References

Completed Files

Completed files are stored in a GitHub repository. Links below will take you to a list of file(s) from today’s lecture. You can view the code via the browser through GitHub’s UI or clone/download the repo to open the code from your computer

Assignment 1: Interests Page

Overview

In his assignment, you will write HTML and CSS to build your first webpage about something that you are interested in. You will use <div> tags to create “sections”, CSS to style the page, and need to look through HTML documentation to add HTML tags that are not covered in this lecture.

Resources

You learned the syntax and some example usage of HTML & CSS in lecture. Now you are expected to look up some HTML tags and CSS properties to use on this assignment. These resources are recommended but you may use other sources.

Requirements

HTML & CSS
  1. Create a new HTML file. Name the file interest.html (all lowercase).
  2. Write all CSS in an internal stylesheet. Do not write inline CSS.
  3. Pick something that you are interested in that you would want to create a web page about. It could be a TV show, a movie, your pet, a video game, a hobby — anything you like. You can grab images and text from an external source.
  4. Save images in a folder named images.
  5. At the top, use a heading tag to display the title of the page, which is the topic you chose.
  6. Create two sections (use <div> tag to create each section). The first section must include:
    1. A secondary heading tag that displays “About [name of interest]”
    2. An image that represents the image
    3. At least two paragraphs about the topic. The text can be from an external source.
    4. A table with at least three rows and columns. You will need to research how to create a table with HTML.
      1. Add a background color to the table heading (the first row of the table).
    5. Some spacing inside and outside the section (see sample).
  7. The second section must include:
    1. A secondary heading tag that displays “Why I like [name of interest]”
    2. A bullet point list with at least three bullet points describing why you like this topic.
    3. Some spacing inside and outside the section (see sample).
  8. Both sections must have a border around it and a width set. 
  9. Horizontally center both sections.
  10. Add a background color to the browser.
  11. Bonus: not required but if you have time — add a custom font using Google fonts (https://fonts.google.com/).
  12. Misc requirements
    1. All elements and text need to be readable (i.e. no dark text colors on dark backgrounds).
    2. No text or images should be at edges of containers or text. Add spacing. See sample for details.
    3. Add spacing between the title and the two sections. See sample for details.
  13. Make sure all tags are closed, all attributes have opening and closing double quotes, and no extraneous tags linger. You will be deducted points for syntax errors.
    1. You can use a validator like this one to check for syntax errors: https://validator.w3.org/
Submission/Upload to the server

Please follow the submission requirements below carefully. You will be deducted points for not following submission requirements to the teeth.

  1. Open a browser and go to https://303.itpwebdev.com/cpanel (it will redirect you to https://54-148-150-30.cprapid.com:2083/).
  2. Login with your username and password (this password does not sync with your USC NETID password. You have created this password separately. If you don’t remember your password, post on EdStem and a course staff member will reset it for you).
  3. Scroll down to Files section and click on File Manager. You will see a list of folders and files like below.
  4. Double click to navigate inside the public_html folder.
  5. Create a new folder inside the public_html folder by clicking on the “+Folder” button on the top left.
  6. Name the folder assignment01. Double click it to navigate inside this folder.
  7. Click on “Upload” to upload your interest.html file to this folder.
  8. Drag and drop your interest.html to upload this file to the server.
  9. Create another folder for your images and upload your images to this folder. Note: file/folder names are case sensitive so use the exact same name and letter casing for all folders/files as you did on your computer.
  10. In your browser, go to http://303.itpwebdev.com/~yourusername/assignment1/interest.html to check that the assignment file has been uploaded correctly.
  11. One last thing. In your computer, open up student_page.html that you created in Lab 1. Add a link to this assignment to student_page.html under the heading “Assignments” so that the graders can easily access your completed assignment.
  12. Re-upload the updated student_page.html to the itpwebdev server via cPanel -> Files -> File Manager. If it asks you want to overwrite the previous file, click Yes.
  13. If all the above is completed, go to your student page at http://303.itpwebdev.com/~yourusername/student_page.html and check that the link to this assignment is there. The TAs/graders use this link to access your assignment so make sure this is working! Here is a sample of what it should look like: http://303.itpwebdev.com/~nayeon/student_page.html (screenshot is also below).
  14. (Optional) If you are having trouble uploading to the server and cannot upload on time, add all files for this assignment in a folder, compress it as a .zip file and upload it to Blackboard. On Blackboard, go to Assignments -> Assignment 1: Interests Page. You will get some points deducted for not uploading correctly but at least you will not get a zero.

Sample

Note: the sample below covers more than the requirements.

Lecture 24: JavaScript Plugins

This topic was not covered in class, but a recording of this topic is provided below for your benefit. JS plugins count as an “extra.”
https://usc.zoom.us/rec/play/TIAqWPjleT6ZBkzUy3pa86s0lgq_PBcMuhfD0njKLfjG0qvBxwjPKg7JF6iWbr4-oEJjf_i9PhRsa9Cj.1HRhQxG6vbP5GwJQ

To-do for today’s class

Slides


Link to download PDF version.

Completed Files

Lecture 24: CSS Transitions, Transform, Animation

To-do for today’s class

Slides


Link to download PDF version.

Resources

Completed files

Lecture 22: cURL, Server-Side APIs

Note: We did not meet for today’s lecture. A recording of the lecture material is below. In previous class, I mentioned the material will cover Spotify and Yelp APIs but unfortunately, those recordings are no longer accessible. I have included at least the code for Yelp and Spotify APIs for those interested.

To-do for today’s class

Slides

Link to download PDF version.

Slides for Yelp & Spotify API

Resources

Completed files

Lecture Recording

Covers the Stripe API, not Yelp or Spotify API.

Assignment 11: Final Project – Front-End

Overview

This assignment serves as a milestone to help you progress along your final project. Now that you submitted a proposal and have an idea of what kind of web application you want to build for the final project, you can start writing code.

Requirements

  1. Refer to the wireframes you created in your final project proposal. Your first step in building the final project will be writing HTML and CSS to build the front end parts of your web application. In other words, you are building the “shell” of your web application. Later, you will need to insert PHP into these pages to connect to your database and run the necessary SQL queries, so keep in mind how you want the backend logic to flow as well.
  2. Setup: Create a folder named assignment11 and add save all files in here. When ready to submit, upload this entire folder to the web server via FileZilla.
  3. Create at least four (4) pages.
  4. You may use CSS frameworks like Bootstrap but you may NOT use HTML templates. Layouts must be your own original work.
  5. Must have a clear purpose and topic. All pages make up a cohesive website.
    1. Have a clear and obvious logo (can be text) or page title in the same area on every page.
    2. Have a clear and obvious navigation menu that makes it easy for users to navigate around the site.
  6. All pages must meet the responsive web design requirements of the final project. The pages must look complete on the following three breakpoints:
    1. Mobile: 767px and smaller
    2. Tablet: 768px – 991px
    3. Desktop: 992px and larger
  7. While you are not graded on the aesthetic value of the website, you will be docked points if there are any obvious issues such as:
    1. Unreadable text, due to:
      1. text is too small
      2. color of text blends in with the background
    2. Text or images get cut off at the edges of the screen
    3. Extraneous horizontal scrolling (i.e. don’t let the user scroll if you don’t need to).
  8. You do not need to write any PHP or SQL at this point (although you can if you’d like).
  9. Use hardcoded values and/or placeholders for data that you will eventually receive from the back-end (similar to the starter code provided for you for the CRUD lectures).

Lecture 20: Membership, Sessions

To-do for today’s class

Slides

Link to download PDF version.

Helpful Readings

Completed files


Assignment 10: Final Project Proposal

Overview

For this assignment, you will write up a proposal for your final project (PDF only, no .docx). Your final project needs to be a full stack web application on any topic. While you need to design your own database, you may use data from different sources.

Requirements

  1. Write up all the below requirements in a document (Word, Google doc, etc). You will need to export a PDF named final_project_proposal.pdf when you are done.
  2. Read over the Final Project requirements and think about what web application you want to build for the final project.
  3. Topic: discuss what your website is about in 1-2 sentences.
  4. Audience: In 1-2 sentences, describe who the intended audience is for this application.
  5. Design & Style:
    1. Discuss design and color scheme in 2-3 sentences.
      1. Don’t know where to start? Coolors.co is a great tool to help you generate color schemes.
      2. Design inspiration: dribbble.com, codepen.io, awwwards.com
    2. Provide links to 3 websites that inspired your design.
  6. Scope:
    1. How many pages are you planning to have?
      1. What are the pages?
    2. If it is a single page website, how many sections are you planning to have?
      1. What are the sections?
  7. Database:
    1. What data will be stored in the database?
    2. Where is data coming from?
  8. Database Diagram:
    1. Design the database you will use for this project and create a database diagram using MySQL Workbench.
    2. You do not need to insert any records. Just the schema is sufficient.
    3. Include the database diagram of your database (image).
  9. Wireframes (minimum of 4 wireframes total):
    1. Include wireframes of what the home page and one other major page of your web application will look like .
      1. You must include at minimum, one mobile version and one desktop version of each page (2 wireframes per page, 4 wireframes total).
    2. These wireframes can be hand-drawn or created digitally using a graphics tool like Figma (free), Sketch, or Adobe Photoshop. You can also use wireframe tools like Whimsical (free version available), Balsamiq or Omnigraffle.
    3. These wireframes do not need to have a ton of detail (placeholders are fine), but should still give you a good idea what the application will end up looking like. Wireframes that look like any of the three samples below are acceptable.
      1. Sample 1 – Hand-drawn
      2. Sample 2 – Wireframe created by Balsamiq
      3. Sample 3 – Wireframe created by Sketch
    4. Of course, if you want to add more detail like colors, real images/text, etc, you are welcome to do so!
    5. Insert these wireframes to the document as well.
  10. This proposal is not set in stone. You may change any aspect of your final project at any time. However, spending a big chunk of time thinking through the final project now rather than later is a wise idea. Don’t treat this assignment trivially.
  11. Submission:
    1. Export this document as a PDF file (name it final_project_proposal.pdf).
    2. Connect to the itpwebdev server on FileZilla.
    3. Create a folder (aka directory) named assignment10 and upload the PDF to this folder.
    4. Open up your student_page.html and add a link to this PDF file.
    5. Upload the student_page.html to the itpwebdev server.