Final Project Requirements

Final Project Overview

For the final project, you will create a full-stack, database-driven web application that uses the all languages taught in this class (HTML, CSS, JavaScript, PHP, SQL). Your web application may be on any topic, as long as you satisfy the requirements below. Your web application must work on itpwebdev.com or a different valid domain if needed. The final project is due on Friday, 05/06 at 11:59pm.

Requirements

General Requirements
  1. Create a folder named final_project and save all project files into this folder.
  2. You must build this web application using the technologies taught in this class (HTML, CSS, JS, SQL, PHP).
  3. This must be a fully functioning, polished web application that is uploaded to the itpwebdev server. This means:
    1. No JS/PHP/SQL errors should be displayed.
    2. All pages are working properly (no 500 or 404 errors).
    3. No extraneous text used during development (e.g.var_dump() strings).
HTML/CSS Requirements
  1. At least four (4) distinct pages
    1. It is up to you on how to design each of the pages. However, each page must have substantial and real content that support the topic of your web application.
    2. “Coming Soon” pages do NOT count as a real page.
    3. Confirmation pages do NOT count as a page (e.g. add_confirmation.php that displays a success message that users have added a record into the database successfully).
  2. Original layout
    1. Come up with your own layout (UI) and workflow.
    2. Do not use class examples, labs, or assignments with modified content. This will result in 0 (zero) score.
    3. You may use Bootstrap or other CSS frameworks but you may NOT use an HTML template or copy the exact design of an existing website.
  3. Navigation menu & logo
    1. A distinct navigation menu exists in all pages of the application.
    2. A logo that exists on all pages of the application. The logo can be text or an image.
  4. External stylesheet
    1. At least one (1) external stylesheet that includes CSS that is shared among multiple pages (e.g. CSS for the navigation menu).
    2. All other CSS can be written in internal stylesheets or its own external stylesheet.
  5. Consistent design
    1. All pages must have a similar structure (header, navigation, footer, etc.).
    2. Consistent look and feel (such as colors, fonts, etc) are used throughout the pages.
  6. Intuitive User Interface (UI)
    1. Clickable elements should be clearly marked,
    2. All links take users somewhere, even if it’s a Coming Soon page (no dead links),
  7. Responsive design
    1. All pages must look polished on mobile, tablet, and desktop devices. No squished or unreadable text, elements going off-screen, etc. Graders will check each page in each of these device sizes:
      1. Mobile: (0 – 767px)
      2. Tablet: (768px – 991px)
      3. Desktop: (992px and larger)
    2. Mobile-first approach is recommended, but not required.
  8. Correct and error-free code
    1. HTML Validation:https://validator.w3.org/.
JavaScript Requirements
  1. Any user input must be validated first by JavaScript, even if the server-side code will also do validation.
  2. Interactivity
    1. Must implement at least one event handler (click, hover, keypress, etc) for a meaningful interaction on at least one page that is NOT related to input validation.
  3. You may use jQuery.
Database Requirements
  1. Design (and normalize) your own database.
    1. Do not use the song, DVD, or football databases from lectures, assignments, or labs.
  2. At least three (3) tables and two (2) table relationships.
  3. Populate the database with sufficient data.
    1. There must be at least 10 rows in at least one table.
    2. If implementing pagination, the database needs to have enough records to show a few pages.
    3. Optionally, you may use data from other sources, such as:
      1. https://www.data.gov/
      2. https://data.ca.gov/
      3. https://data.lacity.org
      4. https://geohub.lacity.org
PHP Requirements
  1. Use MySQLi to connect and interact with the database.
    1. All MySQLi errors as discussed in class are checked and handled.
  2. CRUD functionality 
    1. Web application needs to Create, Retrieve, Update, and Delete records from the database.
    2. You can allow any user to CRUD or only allow privileged users to perform certain actions (e.g. only admin users can delete records).
  3. Handle any user input errors, even if JavaScript already does so.
Project Extras

Choose to implement at least two (2) of the following extras:

  1. A CSS framework or library (except Bootstrap), such as Foundation, Materialize, tailwind, etc.
  2. A CSS pre-processor such as Sass.
  3. JSON/ JSONP API or REST (Server-Side) API,
    1. An API demoed in class or used in your assignments or labs (e.g. Movie DB, iTunes, Weatherbit, etc) can be used but it will NOT be counted as an extra requirement.
    2. List of Public APIs
  4. JS library, plugin, or framework (jQuery does not count)
  5. PHP library or framework such as Laravel
  6. CSS / JS Animations:
    1. Must be more complex than a simple transition from one CSS property to another. A good rule of thumb: transition at least two properties. Some examples:
      1. https://codepen.io/matchboxhero/pen/EwdmmP?editors=1100
      2. https://codepen.io/benstanley/pen/icqok
  7. Different User Permission Levels:
    1. At least three levels: general (everyone), registered users, admin (privileged) users
    2. For example:
      1. Everyone is able to search and get results.
      2. Only registered users can create and update new records (blog posts, comments, etc).
      3. Only admin users are able to delete records.
  8. Frontend ↔ Backend AJAX ( JavaScript ↔ PHP )
  9. Sessions or cookies not related to registration or login
  10. Pagination
  11. Web Storage
  12. File Upload
  13. Other – consult the instructor.
Final Project Summary
  1. When finished with the final project, write up a project summary by filling out one of the templates.
    1. MS Word Doc
    2. Google Doc (Click File -> Make a copy to make a copy of it to your own Google Drive. Then fill it out).
  2. Save this as a PDF and upload it to the itpwebdev server.
  3. Link the PDF on your student_page.html. Label it “Final Project Summary.”
Submission
  1. Upload the final_project folder with all of its contents to the itpwebdev server via cPanel -> File Upload.
  2. Link the final project homepage to your student_page.html.
  3. Pro tip: there are ALWAYS issues when uploading files to the “live” web server. Give yourself plenty of time to upload (i.e. don’t upload to the itpwebdev server 5 minutes before the deadline).
  4. “But it works on my computer” is not an acceptable excuse. This is a web application – it must work correctly on the web and must be accessible to anyone with the Internet.

Past Final Projects

Below are several different types of web applications but all of them met the basic requirements. Get as creative as you’d like. Treat this like a project that you want to use to show off to potential employers 🙂

Resources

See this edstem post for a full list of resources you can use on this final project. In web development, there are so many free resources. This list covers some that have been helpful to students in the past.

Final Project Extension

Only if you absolutely need it — you may take an extension that will give you an extra day to complete the final project (due Sat 5/7 by 11:59pm). To obtain an extension, fill out this form by 5/6 11:59pm: https://forms.gle/6wD5KBas2jYMoUWN9 .

There will be a 7% penalty for using an extension and no office hours on Saturday. So only take the extension if you really need it. Responses to edstem posts will also be limited.

Final Project Presentations

On the day/time that is scheduled for the Final Exam for this class, we will meet on Zoom for final project presentations. Everyone is required to attend but presenting your final project is optional for extra credit. 

Presentation Date/time
  • 12pm section: Wed 5/11 at 2-4pm Pacific time.
  • 4pm section: Thu 5/5 at 4:30pm – 6:30pm Pacific time.
Presentation

The presentation is expected to be about 5 minutes long. Give us a tour of your final project and highlight any specific features that you want to show off. 

Tell us your:

  • Name
  • Year
  • Major
  • The topic of your final project
  • Why did you choose this topic?
  • Who is the main audience for this project?
  • Click through the pages and give us a tour of your final project.
Sign up to present

Because we have a limited time slot for final project presentations, only the first 22 people that sign up will be able to present. To sign up, add your name to this google sheet: https://docs.google.com/spreadsheets/d/1dkgugE9HBjZPMncNLWypz1dBPrVlR44eeBMtJ6WxbnY/edit?usp=sharing.
Lecture 10: Transitions, Transformations

To-do for today’s class

Slides

View Slides
Link to download PDF version.

Completed Files

Completed files are stored in a GitHub repository. Links below will take you to a list of file(s) from today’s lecture. You can view the code via the browser through GitHub’s UI or clone/download the repo to open the code from your computer.

Lab 10: DVD Detail Pages

Overview

For this lab, you will create the detail pages using your DVD database.

Sample

Note: samples below don’t always meet all the requirements. Make sure to follow the requirements rather than solely relying on the samples.

http://303.itpwebdev.com/~nayeon/dvd-details/

Requirements

HTML/CSS
  1. You may use the given starter HTML files (styled with Bootstrap) or create your own HTML files for practice.
Search Form & Search Results
  1. Same requirements as in Assignment 8.
  2. You may re-use your Assignment 8 files.
  3. Each DVD title should be a link to Detail Page.
  4. If you took an extension for A8 and do not have the search pages complete, hard code a song track result in the search_result.php and link that result to the detail page.
Detail Page
  1. Check for any errors & missing data.
    1. Output appropriate error messages.
  2. Display all information corresponding to the DVD.
    1. Title,
    2. Release Date,
    3. Award,
    4. Label (name, not primary ey),
    5. Sound (name, not primary key),
    6. Genre (name, not primary key),
    7. Rating (name, not primary key),
    8. Format (name, not primary key).
  3. Link for users to go back to search results. OK if search query is not saved.
Submission/Upload to the server

Please follow the submission requirements below carefully. You will be deducted points for not following submission requirements to the teeth.

  1. Open a browser and go to https://303.itpwebdev.com/cpanel (it will redirect you to https://54-148-150-30.cprapid.com:2083/).
  2. Login with your username and password (this password does not sync with your USC NETID password. You set this password in Lab 1. If you don’t remember your password, post on EdStem and a course staff member will reset it for you).
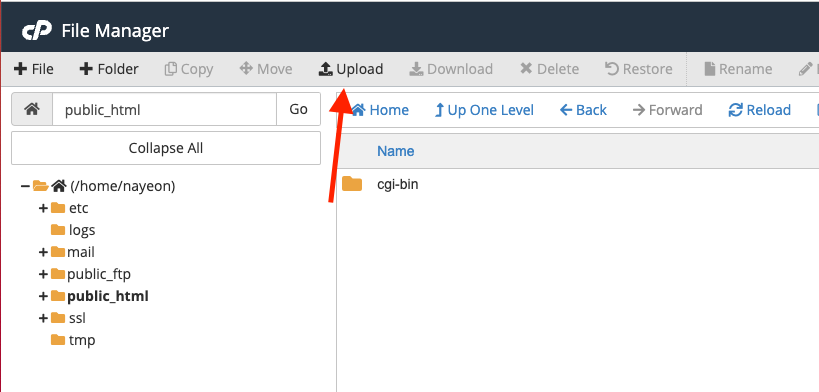
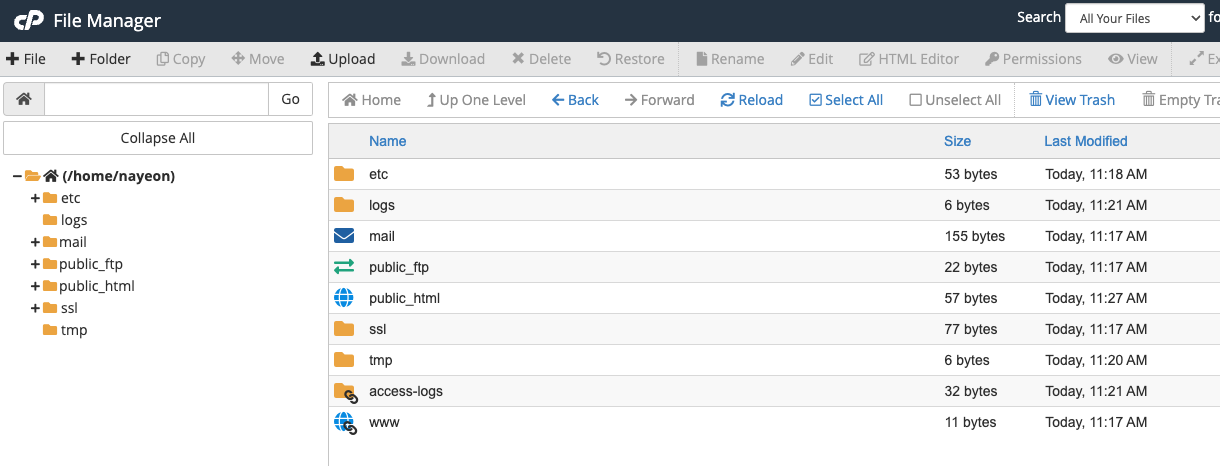
  3. Scroll down to Files section and click on File Manager. You will see a list of folders and files like below.
  4. Double click to navigate inside the public_html folder.
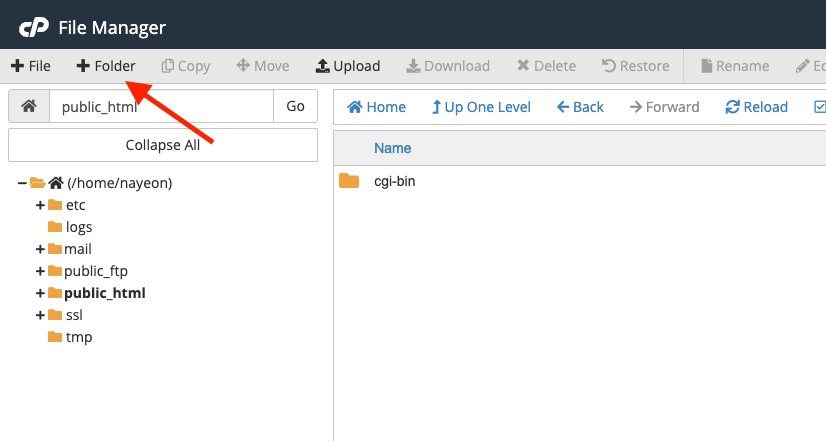
  5. Create a new folder inside the public_html folder by clicking on the +Folder button on the top left.
  6. Name the folder lab10. Double click it to navigate inside this folder.
  7. Click on “Upload” to upload all assignment files to this folder.
  8. Drag and drop all assignment files to upload into this folder.
  9. In your browser, go to http://303.itpwebdev.com/~yourusername/lab10/search_form.php to check that the assignment file has been uploaded correctly.
  10. One last thing. In your computer, open up student_page.html that you created in Lab 2. Add a link to this assignment to student_page.html under the heading “Assignments” so that the graders can easily access your completed assignment.
  11. Re-upload the updated student_page.html to the itpwebdev server via cPanel -> Files -> File Manager. If it asks you want to overwrite the previous file, click Yes.
  12. If all the above is completed, go to your student page at http://303.itpwebdev.com/~yourusername/student_page.html and check that the link to this assignment is there. The TAs/graders use this link to access your assignment so make sure this is working! Below is a screenshot sample of what it should look like.
  13. (Optional) If you are having trouble uploading to the server and cannot upload on time, add all files for this assignment in a folder, compress it as a .zip file and upload it to Blackboard. On Blackboard, go to Assignments/Labs -> Lab 10: DVD Detail Pages. You will get some points deducted for not uploading correctly but at least you will not get a zero.

Assignment 9: CRUD DVD App

Overview

For this assignment, you will complete a CRUD application using your DVD database.

Sample

Note: samples below don’t always meet all the requirements. Make sure to follow the requirements rather than solely relying on the samples.

http://304.itpwebdev.com/~zune/assignment_07/index.php

Caching

Browsers like to cache previous versions of your web files. After you upload the completed files to the server and test them, you might notice that your changes are not showing. For example, add a new DVD and search for it. If the new DVD does not show up in the search_results.php, your browser may be caching a previous version of this file.

If this happens, open MySQL Workbench and double-check that your database is accurate. Then, try to hard refresh the page by pressing Shift on your keyboard while clicking the refresh icon in the browser. This will force the browser to show the late version of the file.

Requirements

HTML/CSS
  1. You may use the given starter HTML files (styled with Bootstrap) or create your own HTML files for practice.
CRUD Workflow
  1. You can use any workflow, as long as you provide full CRUD functionality
Main Page (index.php)
  1. Page title
  2. Links to Search Form and Add Form
Search Form & Search Results
  1. Same requirements as in Assignment 8.
  2. You may re-use your Assignment 8 files.
  3. Each DVD title should be a link to Detail Page (completed in Lab 10).
  4. Additionally, each DVD Title on Search Results page should have a delete button where users can click to delete the title.
Detail Page
  1. Same requirements as in Lab 10.
  2. You may re-use your Lab 10 files.
Add Form
  1. Check for any errors and missing data.
    1. Output appropriate error messages.
  2. DVD Title text field (indicate as required field).
  3. Following drop-downs dynamically populated with data from the database.
    1. Genre,
    2. Rating,
    3. Label,
    4. Format,
    5. Sound,
    6. Use primary keys for value attributes,
    7. Display the name (genre, rating, etc) as a drop-down option,
    8. Include Select One (empty/no selection) as the first option in each drop-down.
  4. Award Text Area.
  5. Release Date Date Input (<input type='date'...>).
Add Confirmation
  1. All PHP & MySQL errors are handled and displayed.
    1. Including missing user input for required fields.
  2. Add DVD to the database using prepared statements.
    1. Only DVD Title is a required field.
    2. Other fields should have user-selected values or NULL.
  3. Display the following message if DVD is added successfully in green:
    1. [DVD Title] was successfully added.
  4. Note: When searching for newly added records, you might have to do hard-refresh (Control/Command + R) to see them.
Delete & Update Functionality
  1. Users need to be able to update and delete each DVD record.
    1. Show confirmation popup before actually deleting the record.
Delete Page
  1. Check for any errors & missing data.
    1. Output appropriate error messages.
  2. Delete DVD record from the database.
  3. Display the following message if DVD is deleted successfully:
    1. [DVD Title] was successfully deleted.
Edit Form
  1. Check for any errors & missing data.
    1. Output appropriate error messages.
  2. DVD Title text field (indicate as a required field).
  3. Following drop-downs dynamically populated with data from the database.
    1. Genre,
    2. Rating,
    3. Label,
    4. Format,
    5. Sound,
    6. User primary keys for value attributes
    7. Display the name (genre, rating, etc) as drop-down option,
    8. Include Select One as first option in each drop-down.
  4. Award Text Area.
  5. Release Date Date Input (<input type=”date”>…)
  6. DVD Title ID hidden field with value set to current DVD’s primary key.
  7. Only DVD Title is a required field for user input. All other fields are optional.
  8. All form fields need to be pre-populated or have current DVD’s data pre-selected.
    1. For example:
      1. Pre-populate DVD Title text-field with DVD’s current title.
      2. Pre-select drop-downs with DVD’s current drop-down value.
  9. Submit & Reset buttons.
Edit Confirmation Page
  1. Check for any errors & missing data.
    1. Output appropriate error messages.
  2. Update the DVD record in the database using prepared statements.
  3. Display the following message if DVD is updated successfully:
    1. [DVD Title] was successfully updated.
  4. Provide a link to the details page for edited DVD record.
Submission/Upload to the server

Please follow the submission requirements below carefully. You will be deducted points for not following submission requirements to the teeth.

  1. Open a browser and go to https://303.itpwebdev.com/cpanel (it will redirect you to https://54-148-150-30.cprapid.com:2083/).
  2. Login with your username and password (this password does not sync with your USC NETID password. You set this password in Lab 1. If you don’t remember your password, post on EdStem and a course staff member will reset it for you).
  3. Scroll down to Files section and click on File Manager. You will see a list of folders and files like below.
  4. Double click to navigate inside the public_html folder.
  5. Create a new folder inside the public_html folder by clicking on the +Folder button on the top left.
  6. Name the folder assignment09. Double click it to navigate inside this folder.
  7. Click on “Upload” to upload all assignment files to this folder.
  8. Drag and drop all assignment files to upload into this folder.
  9. In your browser, go to http://303.itpwebdev.com/~yourusername/assignment09/index.php to check that the assignment file has been uploaded correctly.
  10. One last thing. In your computer, open up student_page.html that you created in Lab 2. Add a link to this assignment to student_page.html under the heading “Assignments” so that the graders can easily access your completed assignment.
  11. Re-upload the updated student_page.html to the itpwebdev server via cPanel -> Files -> File Manager. If it asks you want to overwrite the previous file, click Yes.
  12. If all the above is completed, go to your student page at http://303.itpwebdev.com/~yourusername/student_page.html and check that the link to this assignment is there. The TAs/graders use this link to access your assignment so make sure this is working! Below is a screenshot sample of what it should look like.
  13. (Optional) If you are having trouble uploading to the server and cannot upload on time, add all files for this assignment in a folder, compress it as a .zip file and upload it to Blackboard. On Blackboard, go to Assignments -> Assignment 9: CRUD DVD App. You will get some points deducted for not uploading correctly but at least you will not get a zero.

Midterm: Server-Side Information

When & Where: Online, through Gradescope.com can start the exam between Thu, 04/07 12:00 pm to Fri, 04/08 6:00 pm.

Length & Format: 80 minutes, online exam.

Topics: Database Basics, Database Design (Lecture #13) to CRUD Part 2 (Lecture #19)

Types of Questions: 

  • Multiple choice – select one answer
  • Multiple choice – select all that apply
  • True/False
  • Fill in the blank
  • Short Code

How to take the exam:

  • Log in to gradescope.com. You will need to create an account if you haven’t already with your USC email address.
  • Once you have logged in, you should see “Midterm: Server-side Exam”
  • Have questions during the exam? Because you are allowed to take the exam at any time, we will be unable to answer questions you have during the exam like you would in a physical setting. Make your best-educated guess and for really uncertain questions make a note about it separately and email it to the instructor after the exam.

Important Notes:

  • This is an open-book exam. You may use notes, slides, and online resources. The only thing you CANNOT do is collaborate with any human beings on this exam. Do not discuss with anyone about the exam. Your exam must be completed on your own, by yourself.
    • Any suspicion of collaboration will be reported to SJACS.
  • I highly recommend you create one single reference sheet instead of scouring your notes/slides/etc during the exam. This is a timed test so you want to limit time wasted on looking stuff up.
  • You will be asked to design a database and create an EER diagram (like the Simple Film Database lab). You can hand-draw one up, take a photo of it and upload it, or use Workbench to create one.

Tips:

  • Anything that appeared on the lecture or the slides is fair game. The best way to study for this exam is to review the code from lectures and your labs and assignments and review what each line of the code does. Rewriting some of the code is very helpful.
  • Review the links under Resources/Helpful Reading under each lecture notes to get a deeper understanding of topic(s) taught in that lecture.

Study Guide:

Short Coding Sample questions:

  • Sample questions
  • Solutions (Pro tip: try the questions without seeing the solutions first)
  • There is no full practice exam for this exam.

Lecture 17: PHP MySQLi

To-do for today’s class

  • Download starter file: lect17-php-mysqli/ (Google Drive)
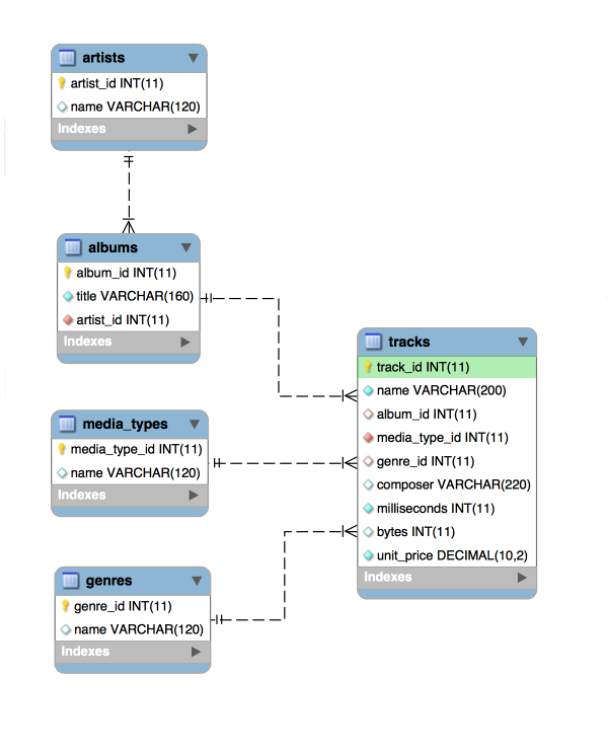
  • Refer to the song database diagram:

Helpful Readings

Slides


Link to download PDF version.

Lecture Files

Lecture 9: iframes, Media Tags

To-do for today’s class

Slides

View Slides
Link to download PDF version.

Completed Files

Completed files are stored in a GitHub repository. Links below will take you to a list of file(s) from today’s lecture. You can view the code via the browser through GitHub’s UI or clone/download the repo to open the code from your computer.

Assignment 8: DVD Search Pages

Overview

For this assignment, you will create search form and search results page for DVD database. All data and results should be dynamic and come directly from the database.

Sample

Note: samples below don’t always meet all the requirements. Make sure to follow the requirements rather than solely relying on the samples.

http://303.itpwebdev.com/~nayeon/a08-dvd-search/search_form.php

Requirements

DVD Search Form Page
  1. Download starter files: a08-dvd-search. You are welcome to write your own HTML if you wish to get some practice.
  2. Check for any database errors as shown in lecture (after establishing a connection to the database and then after submitting the SQL to the server).
  3. DVD Title text field.
  4. Following drop-downs dynamically populated with data from the database.
    1. Genre,
    2. Rating,
    3. Label,
    4. Format,
    5. Sound,
    6. Use primary keys for value attributes
    7. Display the name (genre, rating, etc.) as drop-down options,
    8. Include All as the first option in each drop-down.
  5. Award radio buttons:
    1. Any (records with or without awards),
    2. Yes (only records with awards),
    3. No (only records without awards),
  6. Release date:
    1. Allow users to choose a date range (from and to)
    2. Users can fill out one, both or neither fields.
  7. Submit & Reset buttons.
DVD Search Results Page
  1. Remember to check for any database errors as shown in lecture.
  2. Search Form should submit to this page.
  3. Include “Back to Form” link for users to submit another form.
  4. Perform all validation as needed.
    1. Page should still work even if any of the parameters are missing.
  5. Based on user input, query the database and display correct results.
  6. Show how many results search query produced.
    1. For example: Showing 7886 result(s).
  7. Display following fields in tabular or table format:
    1. DVD title,
    2. Release Date,
      1. Only show DVD results that match the date range user has given.
      2. If no date fields were submitted, it is ok to show DVDs that do not have a release date.
    3. Genre (name, not primary key),
    4. Rating (name, not primary key).
  8. Tip: Before writing the SQL statement to search, var_dump out the variables you are getting passed through from the Search Form. This will help you write out the SQL statement.
Hints
  • GET or POST?
    • Does this form handle any sensitive data?
    • Is this data being added to the database?
  • Radio buttons also use the HTML attribute value to determine which radio button was selected.
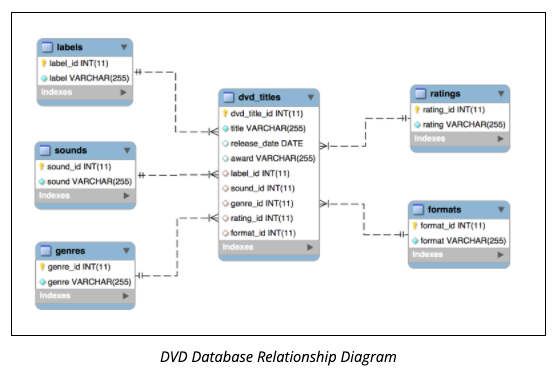
  • Refer to the DVD database diagram to ensure you are using the correct columns names.
Submission/Upload to the server

Please follow the submission requirements below carefully. You will be deducted points for not following submission requirements to the teeth.

  1. Open a browser and go to https://303.itpwebdev.com/cpanel (it will redirect you to https://54-148-150-30.cprapid.com:2083/).
  2. Login with your username and password (this password does not sync with your USC NETID password. You set this password in Lab 1. If you don’t remember your password, post on EdStem and a course staff member will reset it for you).
  3. Scroll down to Files section and click on File Manager. You will see a list of folders and files like below.
  4. Double click to navigate inside the public_html folder.
  5. Create a new folder inside the public_html folder by clicking on the +Folder button on the top left.
  6. Name the folder assignment08. Double click it to navigate inside this folder.
  7. Click on “Upload” to upload all assignment files to this folder.
  8. Drag and drop all assignment files to upload into this folder.
  9. In your browser, go to http://303.itpwebdev.com/~yourusername/assignment08/search_form.php to check that the assignment file has been uploaded correctly.
  10. One last thing. In your computer, open up student_page.html that you created in Lab 2. Add a link to this assignment to student_page.html under the heading “Assignments” so that the graders can easily access your completed assignment.
  11. Re-upload the updated student_page.html to the itpwebdev server via cPanel -> Files -> File Manager. If it asks you want to overwrite the previous file, click Yes.
  12. If all the above is completed, go to your student page at http://303.itpwebdev.com/~yourusername/student_page.html and check that the link to this assignment is there. The TAs/graders use this link to access your assignment so make sure this is working! Below is a screenshot sample of what it should look like.
  13. (Optional) If you are having trouble uploading to the server and cannot upload on time, add all files for this assignment in a folder, compress it as a .zip file and upload it to Blackboard. On Blackboard, go to Assignments -> Assignment 8: DVD Search Pages. You will get some points deducted for not uploading correctly but at least you will not get a zero.


Lecture 16: Intro to PHP

To-do for today’s class

  1. Download starter file: lect16-intro-php/ (Google Drive)
  2. Download MAMP (for both Mac and Windows): https://www.mamp.info/en/downloads/
    1. Both MAMP PRO and MAMP may be downloaded but we will only be using MAMP (the free version). MAMP PRO is not required for this class.
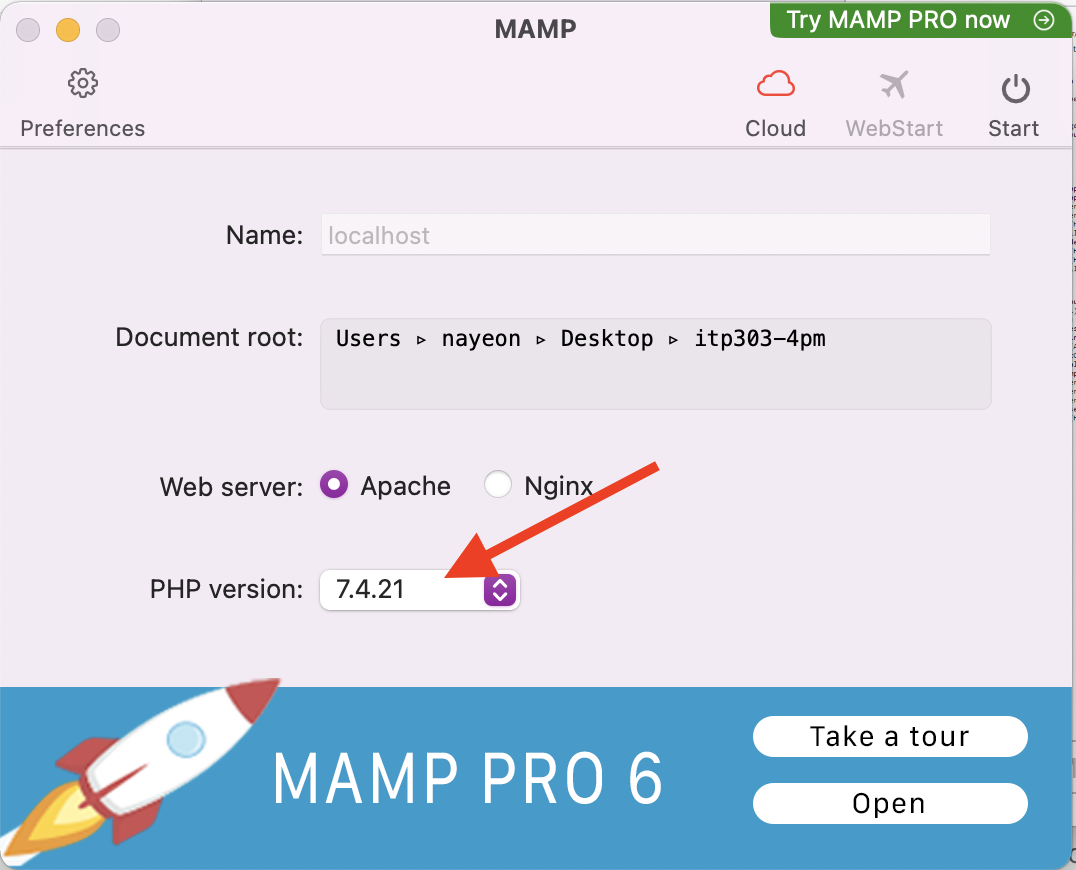
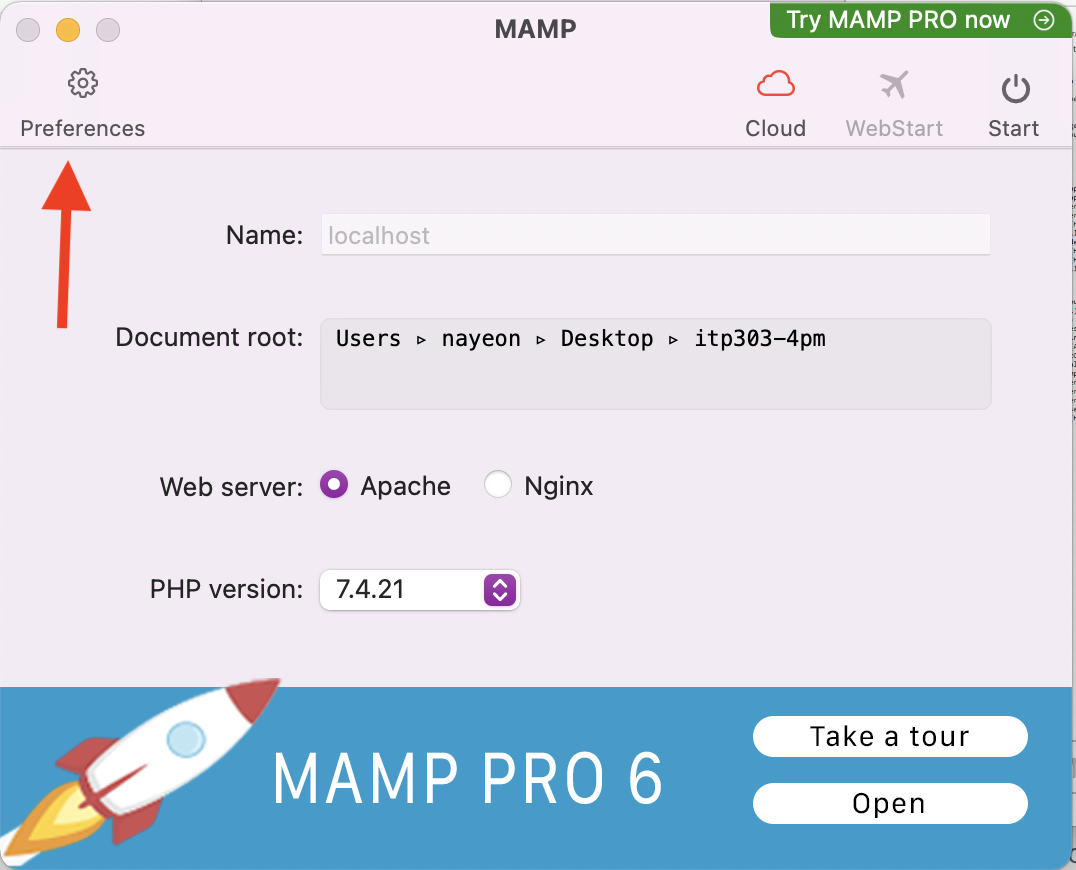
  3. After opening MAMP, select PHP version 7.4.* (or any version 7) on the bottom of the main panel.
  4. Click on the “Preferences” gear icon on the top left of the main panel.
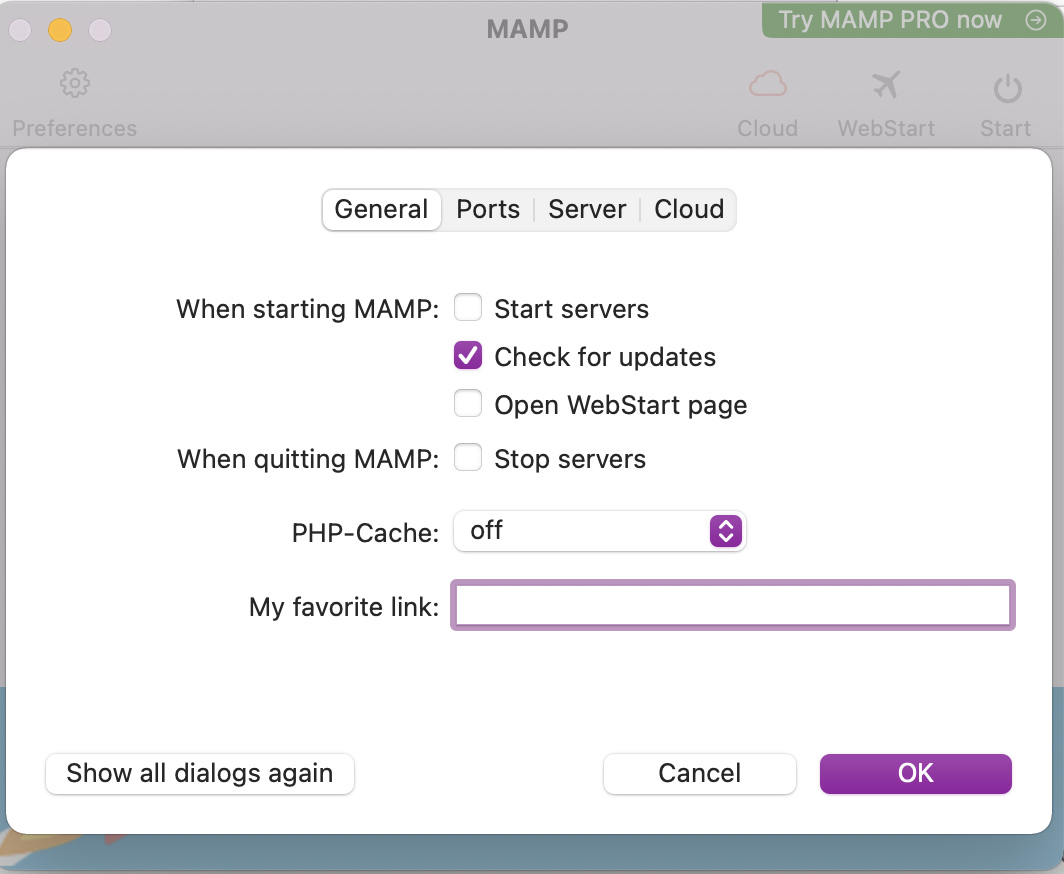
  5. In the “General” tab, select the dropdown next to PHP-cache and select “off”. This will prevent MAMP from caching and allow you to see instant updates.
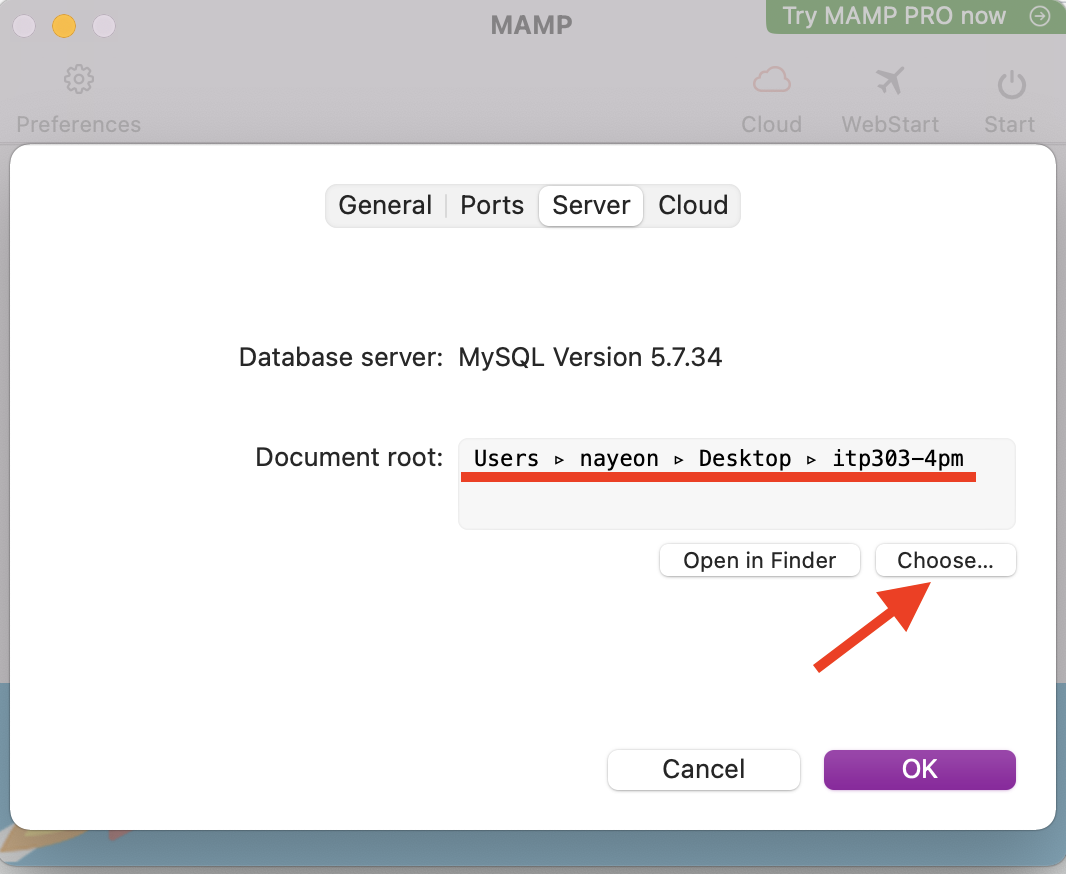
  6. Click on the “Server” tab.
  7. Change the Document root folder to the folder that contains all your ITP 303 files. Click on “Choose” button to navigate to the folder and select it.
  8. Locate the php.ini file, which is a configuration file that allows you to configure many aspects of PHP.
    1. Mac: /Applications/MAMP/bin/php/php{version_num}/conf/php.ini
    2. Windows: C://MAMP/conf/php{version_num}/php.ini
  9. Search for display_errors. You will see a few results. Look for a statement that reads display_errors = Off, which is around line 472.
  10. Change this line so that it reads display_errors = On. Note the capital “O” on On. This will make PHP show errors on the browser while you write PHP. This is super helpful during development.
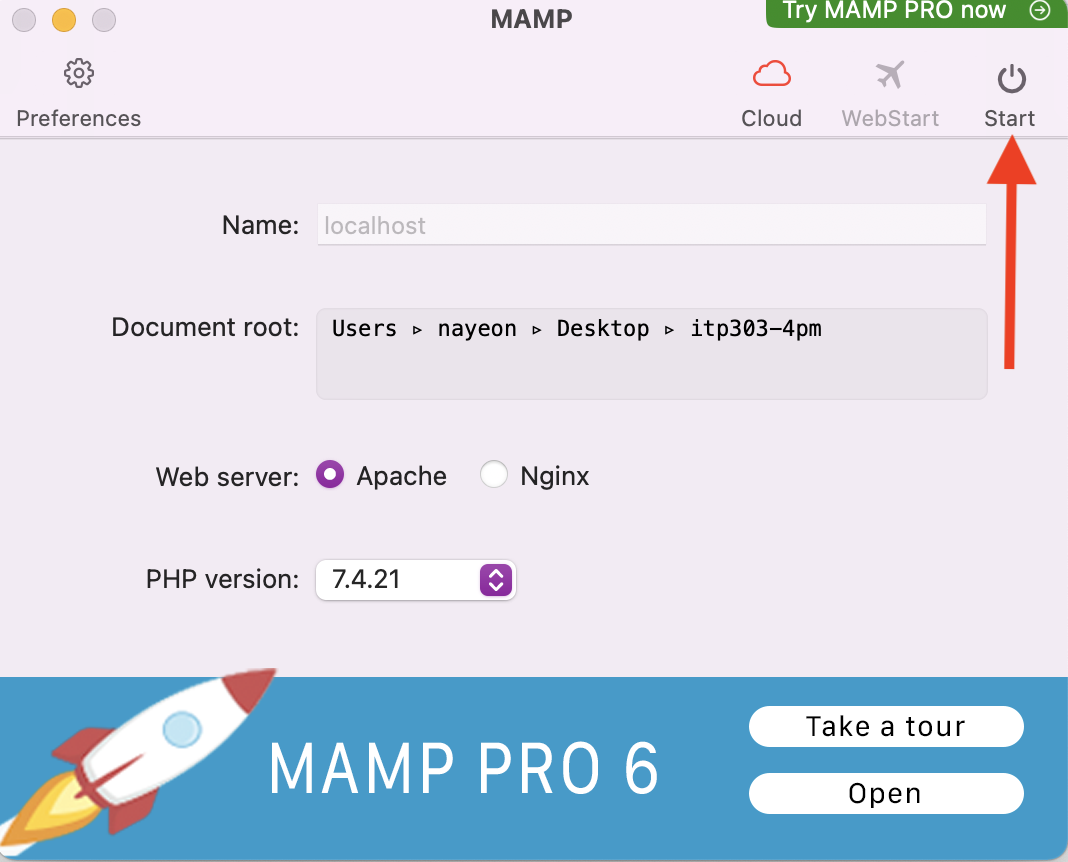
  11. You will need to restart the server if you already started the server. If you have never started the server before, click the “Start” icon on the top right of the main panel.
  12. Give it a few minutes to boot a simulated web server. You will notice a browser tab open up with the URL set to localhost.
  13. Refer to the official PHP documentation here: http://php.net

Slides

Link to download PDF version.

Resources

Completed files